In the previous sections of this chapter the concepts and mechanics
of working with transactions in GnuCash have been discussed. This section
will expand upon the chart of accounts initially built in the previous
chapter, by setting some opening balances, adding transactions and a
scheduled transaction.
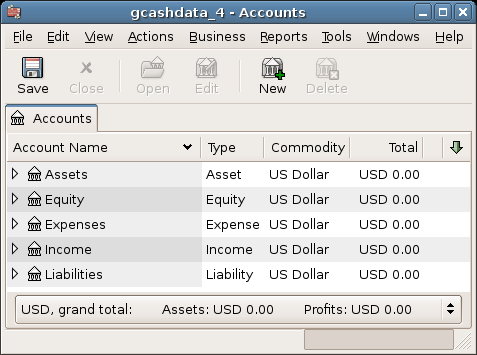
Start with opening the previous datafile we stored,
gcashdata_3emptyAccts, and store it as
gcashdata_4 directly. The main window should look
something like this:
As shown earlier in Section 4.3.1, “Simple Transaction Example” with the Assets:Checking account, the starting balances in an account are typically assigned to a special account called Equity:Opening Balance. To start filling in this chart of account, begin by setting the starting balances for the accounts. Assume that there is $1000 in the savings account and $500 charged on the credit card.
Open the Assets:Savings account register. Select from the menu and check to make sure you are in Basic Ledger style. You will view your transactions in the other modes later, but for now let’s enter a basic transaction using the basic default style.
From the Assets:Savings account register window, enter a basic 2 account transaction to set your starting balance to $1000, transferred from Equity:Opening Balance. Remember, basic transactions transfer money from a source account to a destination account. Record the transaction (press the Enter key, or click on the icon).
From the Assets:Checking account register window, enter a basic 2 account transaction to set your starting balance to $1000, transferred from Equity:Opening Balance.
From the Liabilities:Visa account register window, enter a basic 2 account transaction to set your starting balance to $500, transferred from Equity:Opening Balance. This is done by entering the $500 as a charge in the Visa account (or decrease in the Opening Balance account), since it is money you borrowed. Record the transaction (press the Enter key, or click on the icon).
You should now have 3 accounts with opening balances set. Assets:Checking, Assets:Savings, and Liabilities:Visa.
Now add some more transactions to simulate a month’s expenses. During the month, $78 is spent on electricity, $45 on phone, and $350 on rent. All paid by check. We also spent $45.21 on groceries, received $670 as salary, and paid our Internet bill this month. Finally, let’s move $100 from the savings account to the checking account.
Open the Expenses:Electricity account register and enter a simple 2 account transaction to pay the $78 electrical bill at the end of the current month (eg: March 28, 2006). Enter a description (eg: Light Company) and the check number (eg: 102). The Transfer account should be Assets:Checking.
Open the Assets:Checking account register and enter a simple 2 account transaction to pay the $45 phone bill at the end of the current month (eg: March 28, 2006). Enter a description (eg: Phone Company Name) and the check number (eg: 103). The Transfer account should be Expenses:Phone. Notice that you can enter expense transactions from either the credit side (the expense accounts) or the debit side (the asset account).
Open the Expenses:Rent account register and enter a simple 2 account transaction to pay the $350 in rent at the end of the current month (eg: March 28, 2006). Enter a description (eg: April Rent) and the check number (eg: 104). The Transfer account should be Assets:Checking.
Duplicate this transaction using the button in the Toolbar. Start by clicking on the current rent transaction, and click on the Duplicate icon. Enter the transaction date a month out in the future (eg: April 28, 2006), and notice the blue line separator that
GnuCashuses to separate future transactions from current ones. In this way, you can enter transactions before they occur.You could also set up a scheduled transaction to pay your rent, since the value of the rent is likely to be constant for the foreseeable future.
Start by clicking on the current (April 28) rent transaction, and click on the Schedule icon
Change to Monthly, change description if needed and press
To transfer money from your savings account to your checking account, open the Assets:Savings account register, add a new transaction setting the Transfer to Assets:Checking in the amount of $100 (date 6 March, 2006).
As another example of a simple 2 account transaction, add another transaction to describe the purchase of $45.21 worth of groceries on 5 of March. From within the Assets:Checking account, you would set Transfer to Expenses:Groceries. The account register should now appear:
To add a paycheck transaction from the Assets:Checking account register window, click on a new transaction line, and click on Split. First enter the description of this transaction on the first line (eg: “Employers R Us”), as well as the date (14 March). In the “split” line below this, enter the deposit into Assets:Checking (eg:$670). Follow this with the various tax deposits (Assets:Checking (eg: $670), Expenses:Taxes:Federal account (eg: $180), Expenses:Taxes:Medicare account (eg: $90), and Expenses:Taxes:Social Security account (eg: $60)) and lastly the gross total of your paycheck (eg: $1000) as a withdrawal transfer from Income:Salary.
You also need to pay for your Internet subscription of 20 USD on the 28th.
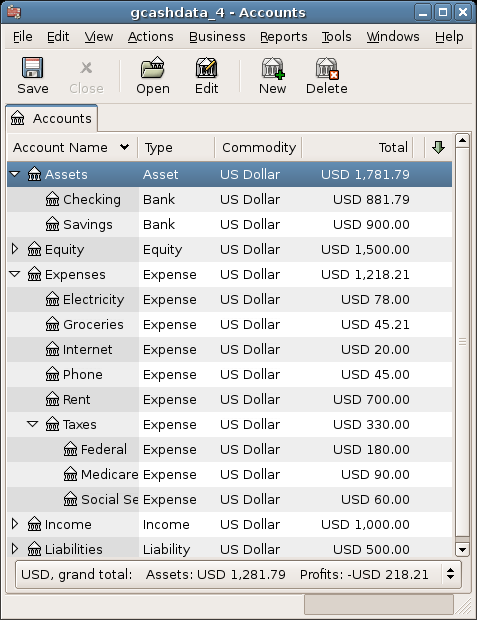
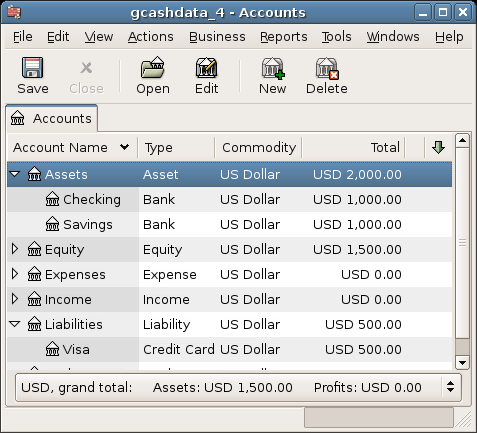
This image shows the ending balances after Chapter 4, Transactions.
But only having data available on the computer screen will not
make your accountant happy, therefore GnuCash comes with a large number
of highly customizable reports.
Let’s have a look at a Cash Flow, and a Transaction Report.
First let’s have a look at the Cash Flow report for the month of March.
Select the cash flow report from → → .
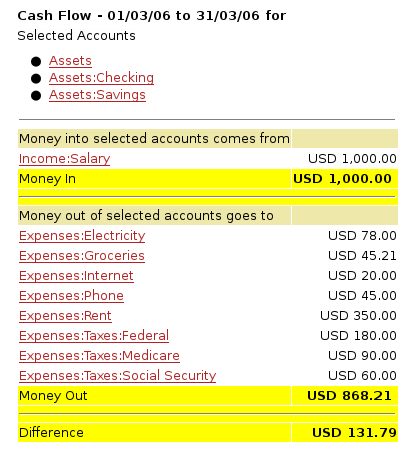
This image shows the Cash Flow report after Chapter 4, Transactions.
To get this customized report, right click in the report and choose Report Options. Then set the time period, and specify which accounts you want in the report.
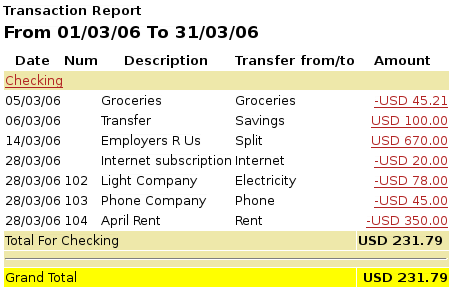
Now let’s have a look at corresponding transaction report for the Checking account.
Select the transaction report from → .
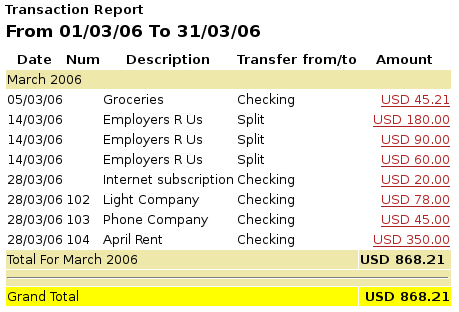
Now let’s change the transaction report to only show the various Expenses accounts.