This chapter will give you the basic information you need to understand and use transactions in
GnuCash. Whereas accounts are the framework and structure of a chart of accounts, transactions are
the data which fills each account.
A transaction in a double entry accounting system such as GnuCash is an exchange
between at least 2 accounts. Thus, a single transaction must always consist of at least two
parts, a from and a to account. The
from account is transferring value to the to
account. Accountants call these parts of a transaction Ledger Entries. In
GnuCash, they are called Splits.
A split identifies the account to which it refers, the amount of money specifically moved to or from
that account, and can contain a few other specific pieces of information if needed. GnuCash
supports multiple splits in a single transaction, and the splits can move money into or out of
the involved accounts arbitrarily.
For example, you receive a paycheck and deposit it into your savings account at the bank. The transaction that occurs is that your bank savings account (an asset) received money from your income account. Two accounts are affected, and in this case there is a net increase in your equity.
Working with transactions in GnuCash is performed using what is known as the account
register. Every account you create has an account register. It will appear familiar
to you as it looks very similar to the log used to track checkbooks.
The account register is explained in the upcoming section, Section 2.9.2, “The Account Register”.
The account register is the window that allows you to view or edit preexisting
transactions, or add new transactions for a particular account. To open an account register
from the Account Tree, double-click the account name, right click the account name and select
Open Account from the menu, or use the Open button on the toolbar. GnuCash will display the
account register window.
The Titlebar of the account register displays the account name. Below the Titlebar, the Menubar displays the menu items available within the account register, and the Toolbar contains handy buttons that help you work with the account register.
At the bottom left of the register window, GnuCash displays helpful messages as you move about the
register. To the right, you can see the current account balance and the total of cleared
splits.
GnuCash offers several options for viewing your registers. The default style is Basic
Ledger mode, which displays only the summary of splits affecting the current
account. This is the style that most closely resembles other popular personal financial
packages. You can choose a different register style from the
menu. There are two other view modes:
→ style expands the current transaction automatically. As you highlight a new transaction in the register, the transaction automatically expands to show all splits.
→ style shows all splits for all transactions in the register, which is more like an accounting journal.
All styles permit you to view your data in either single-line or double-line format. Select → , and you will see your transaction line expand to two register lines. Double-line mode will also display the transaction-level Notes field.
Below are screenshots that demonstrate how the Basic Ledger and Transaction Journal views differ.
For this example, let’s assume that you have purchased 3 pair of Jeans for $1,000, and have recorded the purchase as a split transaction with each pair entered on a separate split.
The below screenshots illustrate the different view modes.
First let’s view the Jeans transaction from your checking account:

Now, let’s open the Expenses:Clothes account, and look at it in Basic view.
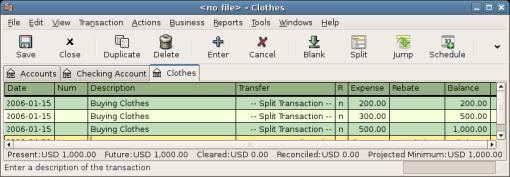
Three entries appear here, but there was only the single split entry in the checking account. Further examination shows that each row has a different amount, $200, $300, and $500. This demonstrates that each row in this view reflects a single split from the original transaction.
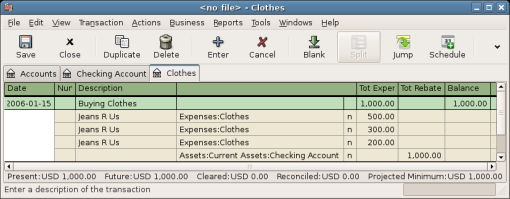
Changing to Transaction Journal mode will display only the original split transaction.
As with most spreadsheet-like displays the columns in the register can be resized by left-clicking
and dragging the dividers in the header. The divider to the right of
the column header controls the width of that column. In GnuCash the
Description and Memo columns autosize to fit the
register into the window so dragging those columns' dividers to the left will shrink the
column but it will snap back when you release it. Dragging them to the right will widen the
display and put a scrollbar at the bottom of the window, but that will persist only while
the register is open. If you close it and reopen it or quit GnuCash the register will again
fill the space exactly.
 | Note |
|---|---|
Many new users have trouble resizing the Balance column, in particular making it larger. Just drag its right-hand border out of the window to grow it. Be careful, though, as there's another column called rate whose width is set to 1 pixel to hide it (it's for internal use). Approach the divider from the left side and click as soon as the cursor changes to a double-headed arrow (<-|->). | |
 | Important |
|---|---|
When in split mode there are different column markers in the header for split rows and transaction rows depending on which type of row is active. In order to adjust split column widths one must first make a split row active; to adjust transaction line column widths a transaction row must be active. | |
Column width settings except for the Description column are saved in the user's book state file and will be restored when the register is closed and reopened.
GnuCash provides several shortcuts to speed data entry:
The date field will interpret short date entries (e.g. 2/15 or 15/2 depending on locale) to mean the month and day in either the current year or within a sliding window encompassing a 12-month period selected in on the Date/Time tab, and the following keys will adjust the currently set date as follows:
+ or = to increment the date and - or _ to decrement the date
] or } to increment the month and [ or { to decrement the month
M or m to enter the first date of the month
H or h to enter the last date of the month
Y or y to enter the first date of the year
R or r to enter the last date of the year
T or t to enter today’s date

Tip These date shortcuts not only work in the account register but everywhere you can enter a date.
Tip Specifically for dates there's another way you can save time: you can enter partial dates. For example if you only enter one number,
GnuCashwill interpret it as the day in the current month of the current year. If you only enter a day and month,GnuCashwill automatically append the year. The default this to take such a date in a sliding window starting 11 months before the current month. This means that if you enter 1/5 (January 5th) as date while the current date is in December 2015, the date will be completed as 1/5/16. This default can be changed via → → +Date Completion . You can change it to either always evaluate a date in the current calendar year or change the start of the sliding window.In the Num field of the transaction line, you can type + to increment the transaction number from the last one you typed in. Typing - will decrement the number. This will also work in the Action field of the split line, if you choose to enter split numbers there. The Action field also supports QuickFill - if you type the first characters of a common action (such as Deposit),
GnuCashwill fill in the rest.Perhaps most powerful of all, as you type in the Description field
GnuCashwill find previous transactions that begin the same as your typing and offer them as completions. When you Tab with the offered completion text shownGnuCashwill copy that previous transaction and focus the Debit or Credit value used, selected and ready for you to overwrite it with a new value.Note This copies the whole transaction including parts that may not be visible like Notes and Price. Unless you intend to exactly duplicate the transaction be sure to edit all fields that should differ.
Tip You can use this feature to fill in the transaction then go back to the Description field and change the description.
The Transfer field supports QuickFill of account names. You can start typing an account name and
GnuCashwill fill in the remaining part of the name. Typing the separator character at any time will complete the current level of the account name, leaving the cursor positioned to start the next level of account name. For example, typing A : C might complete to the Assets:Checking account. Entering the name in sequence this way will pop up the whole account list with the predicted item selected. Alternatively you can type any character sequence in the account name and the popup will display an account list filtered to those accounts containing the characters typed so far. In either case you may use the Up Arrow or Down Arrow to select an account from the popup.In any of the amount fields, you can use a built-in calculator. Simply type in the first value, followed by +, -, *, or /, then type in the second value.
GnuCashwill perform the calculation and return the resulting value to the amount field when you press the Tab key.All of the menu items have access keys defined, and these are marked by underlined characters in the menu names while Alt is hold. Press Alt+
underlined characterto bring up the menu, then select an item by typing its underlined character. For example, typing Alt+A brings up the Actions menu, then typing P will split the transaction. A few of the menu items also have shortcut keys that immediately invoke the command (typically using the Ctrl key). These shortcuts are listed next to the item.To move around the register, use these keys to save time:
Tab to move to the next field, Shift+Tab to move to the previous field
Home to move to the beginning of the field, End to move to the end of the field
Enter or ↓ to move to the next transaction, ↑ to move to the previous transaction
Page Up to move up one screen, Page Down to move down one screen
Shift+Page Up to go to the first transaction, Shift+Page Down to go to the last transaction
In the Reconcile window you can use these keyboard shortcuts:
Tab moves to the next box and Shift+Tab moves to the previous box
Space bar toggles the status between reconciled and not reconciled
↑ and ↓ navigate through the entries within the current box
Every transaction in GnuCash has at least two splits, but a transaction can have more than two splits.
A transaction with only two splits is called a simple transaction, since
it only involves the current account and a single remote account. A transaction with three or
more accounts is called a split transaction.
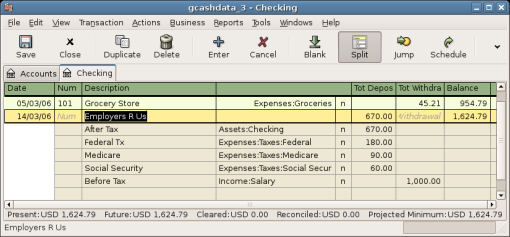
When the register is in Basic view, you will see a summary of the splits affecting the current account. For a simple transaction, the Transfer column will display the other account from which money is transferred. For a split transaction, the Transfer column will display -- Split Transaction --. You can see the individual splits of each transaction by clicking the button in the Toolbar while selecting the appropriate transaction.
For split transactions, the first line of the transaction is the transaction line. It contains a Date, optional Num (such as a check number), transaction Description, total amount affecting the current account (Tot Deposit here), and updated account Balance after the current transaction. Note that in the expanded view, the Transfer column heading disappears, and there is no account name listed in that field. This line shows you only a summary of the transaction’s effect on the current account. For more detailed information, you need to look at the individual splits that make up the transaction.
| Note |
|---|---|
An account register displays a transaction when that transaction has a split assigned to the account. If a given transaction has more than one split assigned to the account, then in Basic and Auto-Split views, that transaction will appear in the register one time for each split assigned to that account. In Transaction Journal view, such a transaction will only appear once in the register. | |
The partial lines below the transaction line are the split lines, and they are separated by gray lines. As you highlight one of the split lines, the column headings change to show the split-related fields:
Each split contains an optional Action, or type of split, which you can either type in or choose from a pull-down list. The split also contains an optional Memo which describes the split. Each split affects an Account, which can be selected from a pull-down list of your accounts. The R field indicates whether the split has been reconciled. The last two columns show the amount of the split and whether money is coming into or going out of the account.
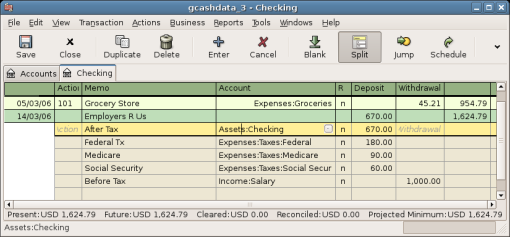
As we discussed in Section 2.1, “Accounting Concepts”, total debits (left-column entries) must equal total credits (right-column entries) for each transaction. In the example shown above, the total debits equal the total credits, so this transaction is balanced. If you notice, the transaction line contains the same debit amount as the Checking split line. Why is this shown twice? Because the transaction line is merely a summary of the transaction’s effect on the current account. The same transaction in a different account will have a different transaction line, one that shows the effect on that particular account. You can see this by highlighting another split line and clicking the button on the Toolbar.
In this example, if you jump to the Income:Salary account, GnuCash brings up the
same transaction in the Income:Salary - Register:
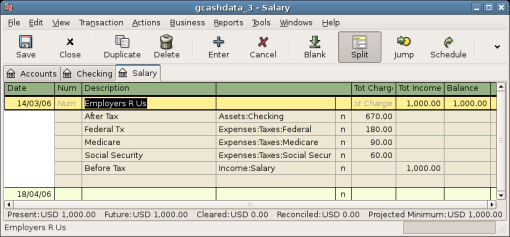
Note that the transaction line total now summarizes the effect on the Income:Salary account instead of the Checking Account, because you are looking at the Income:Salary account register. The splits are exactly the same, but the transaction line now reflects the credit to the Income:Salary account.
Starting with the chart of accounts we created in the previous chapter
gcashdata_3, double click on the Checking asset
account. Let’s add a simple transaction to the checking account. When you first create
your accounts in GnuCash, it is common to start them off with an initial balance.
In the first transaction row, enter a date (e.g.: March, 1, 2006), a description (e.g.: “Opening Balance”), click on the Transfer pop-up menu and select Equity:Opening Balances, add a deposit value of $1,000, and press the Enter key. The account register should now appear similar to this figure:
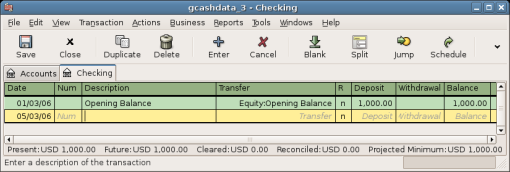
Setting the opening balances of an account is an example of a simple two account transaction. In this case, affecting the Assets:Checking and the Equity:Opening Balances accounts.
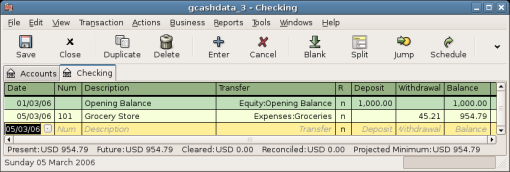
As another example of a simple 2 account transaction, add another transaction to describe the purchase of $45.21 worth of groceries. From within the Assets:Checking account, you would set Transfer to Expenses:Groceries. The account register should now appear:
The need for 3 or more splits in a transaction occurs when you need to split either the “from” or the “to” account in a transaction into multiple accounts. The classic example of this is when you receive a paycheck. Your take home pay from a paycheck will typically be less than your net pay, with the difference being due to taxes, retirement account payments, and/or other items. Thus, the single transaction of you receiving a paycheck involves other accounts besides simply Assets:Checking and Income:Salary.
To add the paycheck split transaction from the Assets:Checking account register window, click on a new transaction line and click Split. Note that if you have set your register view to Auto-Split or Transaction Journal, the splits will be opened for you. Enter the description of this transaction on the first line(e.g. “Employers R Us”). In the split lines below this, enter the various splits that make up this transaction, one by one. To enter the splits, first choose the account, then enter the amount by which to change the account. Keep in mind that when in an asset account register, amounts entered in the left column increase the account balance, while amounts entered in the right column decrease the balance (for more about this, see Section 2.2.3, “Transactions”). Tab or click the next split line and repeat the process. Note that if you are using the keyboard to navigate the transaction, use Tab to move from field to field, as using Enter will commit the transaction and create splits to an Imbalance account.
| Note |
|---|---|
When creating a transaction in | |
In this example, choose the deposit account (Assets:Checking) and then enter the amount that is being deposited into it (e.g. $670). Follow this by entering the amounts for the various taxes: Expenses:Taxes:Federal account, $180; Expenses:Taxes:Medicare account, $90; and Expenses:Taxes:Social Security account, $60. Finally, enter the gross total of your paycheck ($1,000 in this example) as a withdrawal transfer from Income:Salary.
The final split should look like Figure 2.27, “Entering a split transaction”. Remember to press Enter after finishing the entry. But you should also know that when you press Enter, the split view will be “folded” back into a simplified transaction view. The splits are still there; you just have to click Split to view them. See Section 2.9.2.1, “Features of the Account Register” for details.
Once transactions have been entered into GnuCash, it is important to verify that they agree with the
records of your financial institution. This verification process is known as
reconciliation, and it is key to determine whether your
records are accurate. Most commonly, you will check transactions against bank statements,
although you can use this process to verify any transaction.
GnuCash keeps track of the reconciliation status of each transaction. The reconciliation status of a
transaction is shown by the reconciliation R field in a register:
y indicates that a transaction has been reconciled,
n indicates that it has not, and c indicates that it
has been cleared, but not reconciled. A split marked cleared signifies that you got some kind
of confirmation that the institution accepted the order (e.g. you have the restaurant's
receipt for your credit card purchase). You can toggle the reconciliation status between
n and c by clicking in the R
field; you can set it to y by using
Section 2.9.4.1, “Reconcile windows”.
At the bottom of the account window, there are (among others) two running balances (the cleared and reconciled balance), and the total balance. The former balances should correspond to how much money the bank thinks you have in your account, while the latter includes outstanding transactions.
For example, when you write a check for something, you should enter the transaction into GnuCash. The
reconciliation R field of the transaction will initially contain
n (new). Your new entry will contribute to the total
balance, but not to the cleared and reconciled
balance. Later, if you got some confirmation that the check has been cashed, you might click
on the transaction’s R field to change it to c
(cleared). When you do this, the cleared balance will change to include
this amount. When the bank statement arrives, you can then compare it to what you’ve
recorded in GnuCash by opening the reconciliation window. There, you will be able to change the
R field to y (reconciled).
| Note |
|---|---|
You cannot reconcile directly in a register window by clicking in the R field. You must use the reconciliation window. Once a transaction has been marked reconciled, it can no longer be easily changed without breaking the Starting Balance of the next reconciliation. | |
 | Warning |
|---|---|
It is important to understand that reconciliation is done for a given date, and when you reconcile an account based on a statement from a given date, you are reconciling all transactions prior to that date. Therefore, if you add or modify transactions that predate your last reconciliation, your reconciled balances will be thrown off. | |
The reconciliation windows are used to reconcile a GnuCash account with a statement that a bank or
other institution has sent you. Reconciliation is useful not only to double-check your
records against those of your bank, but also to get a better idea of outstanding
transactions, e.g. uncashed checks.
To use the reconciliation windows, select an account from the account tree and click on → . A window like the one below will appear in which you can enter the reconcile information.
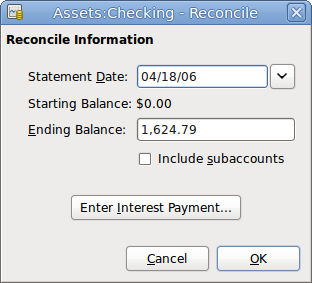
In the initial reconcile window, some Reconcile Information need to be entered.
- Statement Date
The date of the statement you will be reconciling against.
Tip Click on the down arrow in the right of this field to open a calendar
- Starting Balance
This is a non-editable item which displays the balance from the previous reconciliation. It should match the starting balance in your statement.
Warning Sometimes, the starting balance in
GnuCashdoes not match that found on your statement. This can happen the first time you reconcile your account or when a previously-reconciled transaction is de-reconciled or deleted.Note The first time you reconcile your account, the starting balance will be 0.00, thus probably not the opening balance of your account. When you reconcile the account, the opening balance for the account will be included in the reconciliation, and the result should balance.
Tip In the case when a previously-reconciled transaction is accidentally de-reconciled, you can simply re-reconcile the transaction along with the transactions on the current statement, and the result should balance.
The case of accidentally deleting a previously-reconciled transaction presents more of a challenge; if you cannot determine what was deleted and restore it to the register, you will have to create a dummy transaction to get the reconciliation to finish.

Caution While the latter case does not matter for your private accounting, you should have a really good explanation for your auditors, if you are the accountant of a club or a company.
- Ending Balance
This field should be filled with the ending balance as it appears in the statement.
Note GnuCashautomatically fills this field with the Present balance as shown in the lower part of the account’s register.- Include Sub-accounts
Check this option if you want to include in the reconciliation the transactions that belongs to the sub-accounts of the currently selected account. Note that all sub-accounts must be in the same commodity as the parent for the option to be enabled.
Clicking this button opens a new window that allow you to enter an interest transaction to the account to be reconciled.
Tip The Interest Payment window might be opened automatically when you start a reconciliation for an account of the type Bank, Credit, Mutual, Asset, Receivable, Payable, and Liability. If you want to disable this behavior for any of the previous accounts, go to the Register tab of the GnuCash Preferences and uncheck the Automatic interest transfer option. Alternatively, to disable this behavior only for the selected account, press the button in the Interest Payment window.
Then, click on the button, and you will see the transactions listing reconcile window:
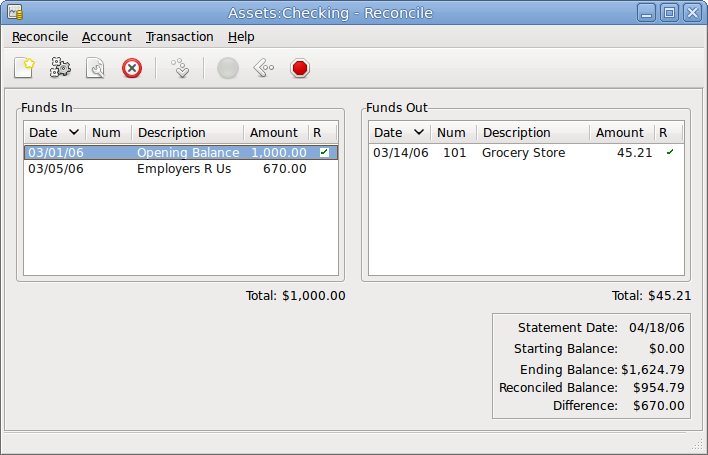
The two panes called Funds In and Funds Out, lists all the unreconciled transactions that belongs to the account that is going to be reconciled. The R columns show whether the transactions have been reconciled.
Now, examine each item on the bank statement, and look for the matching item in the Reconcile window.
If you cannot find a transaction, then perhaps you forgot to enter it, or did not know that the transaction had happened. You can use the button on the Toolbar, or the → menu item in the menu, to open a register window and enter the missing transaction. The new item will appear in the Reconcile window when you press the button in the register after entering the transaction.
When you find the item in the Reconcile window, compare the amount in the item
to the amount on the statement. If they disagree, you may have made an error when you
entered the transaction in GnuCash. You can use the button on the
Toolbar, or the
→
item, to open a register window and correct the transaction.
If the amounts agree, click on the item in the Reconcile window. A check mark
will appear in the R column aside the selected transaction. GnuCash will
automatically update the amounts in the lower right summary pane.
| Tip |
|---|---|
You can use the up/down arrow keys to scroll to the item, the space key to mark the item as reconciled and the Tab key to switch panes. | |
You then repeat this for each item that appears on the bank statement, verifying that the amounts
match with the amounts in GnuCash, and marking off transactions in GnuCash as they are
reconciled.
| Tip |
|---|---|
You can check or uncheck the reconcile status of all transactions in either pane by clicking on a transaction in the required pane then clicking Ctrl-A followed by space. This will toggle the reconcile status of all transactions in the pane to either checked or unchecked state. This procedure can be repeated to achieve the desired status for the transactions in the pane. | |
At the bottom of the Reconcile window there is a
Difference field, which should show 0.00 when you
are done reconciling. If it shows some other value, then either you have missed
transactions, or some amounts may be incorrect in GnuCash. (Or, less likely, the bank may have
made an error.)
| Note |
|---|---|
Under some circumstances, it may be difficult or impossible to determine why an account will not
reconcile. If you are unable to correct the discrepancy between your books and a
statement, To use this, carry out the full reconciliation (marking all transactions that you can identify) and
then click this button. | |
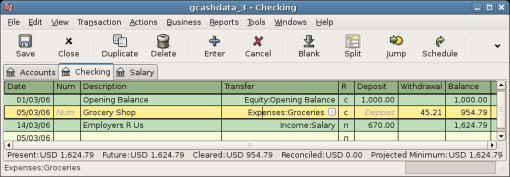
When you have marked off all the items on the bank statement and the difference is 0.00, press the button on the Toolbar or select → from the menu. The Reconcile window will close. In the register window, the R field of the reconciled transactions will change to y.
In this case, we have not received all the information yet, so we simply press the button, so we can continue at a later stage. Observe that the R column indicates we cleared (c) two transactions. They have not been reconciled yet, but we have verified these two transactions so they have been marked as cleared. If you look at the Statusbar at the bottom of the account register, you will see a summary of what has been reconciled and what has been cleared (Cleared:USD 954.79 Reconciled:USD 0.00)
Scheduled transactions are made to help entering repetitive money operations, like subscriptions,
insurances or taxes. By using scheduled transactions, you only have to enter the concerned
transaction once, set a few parameters like start date, frequency and a little description,
and then GnuCash will tell you whenever a scheduled transaction is ready to be created, and
create it for you.
In this how-to, we’ll take a monthly Internet subscription of 20 USD as example, which is taken on the 28th of each month.
In GnuCash, there are two ways of creating scheduled transactions,
from the ledger or from the
Scheduled Transactions Editor.
Enter the first occurrence of your to-schedule transaction in the ledger. In the Transfer field for this transaction, type Expenses:Internet as shown in the next screenshot.
| Note |
|---|---|
Since we did not create the Expenses:Internet account, | |
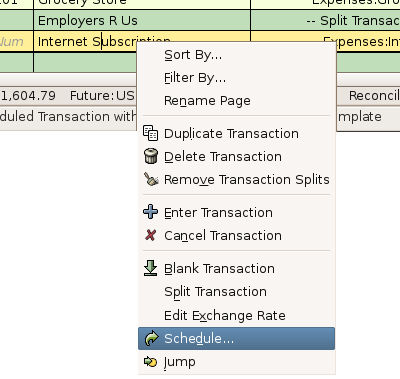
Then you right click on your transaction and select Schedule...
A window like this will appear:
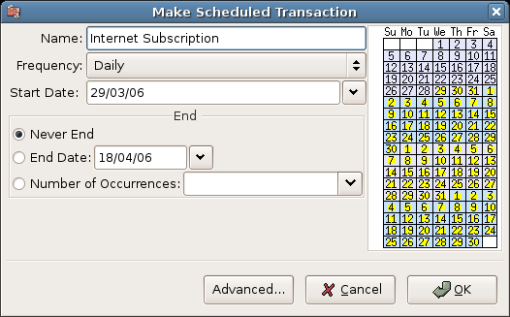
Let’s fill the values, we know that the subscription is taken on the 28th each month, and the next one is for next month (since we entered the one for this month manually) :
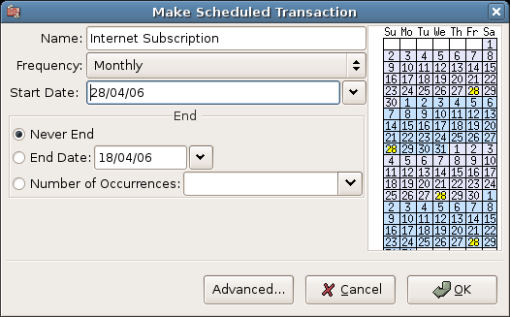
Click the button, and the transaction will be scheduled. GnuCash now has
memorized this scheduled transaction and on the 28th of next month, it will pop up a window
asking if it should create it (see far below for a screenshot of this window).
Another way of entering a scheduled transaction is from the Scheduled Transaction Editor, it may be faster if we have several scheduled transactions to create at once.
From the main accounts windows, select
→ →
from the Menubar. A new Scheduled Transactions tab
will be opened in the current GnuCash window as shown below:
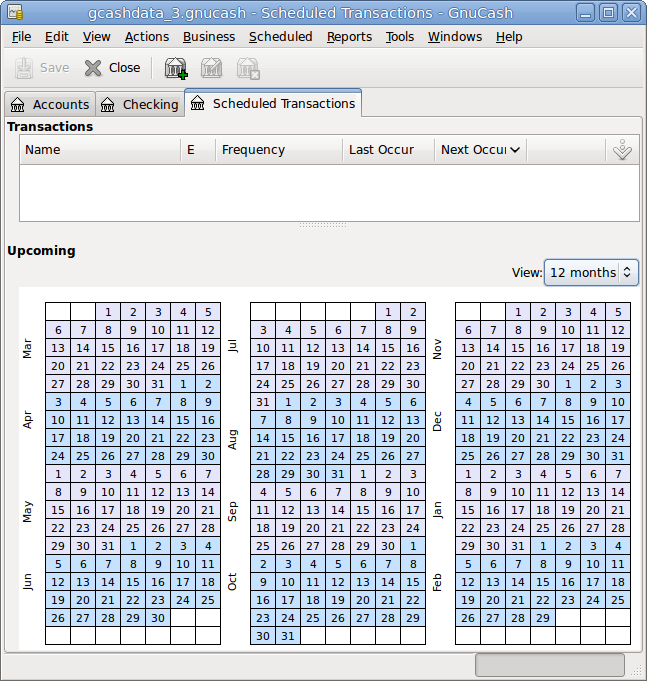
This tab contains a list, now empty, of all the scheduled transactions. Let’s create a new one by clicking on the button in the Toolbar. A window like the one below will pop up:
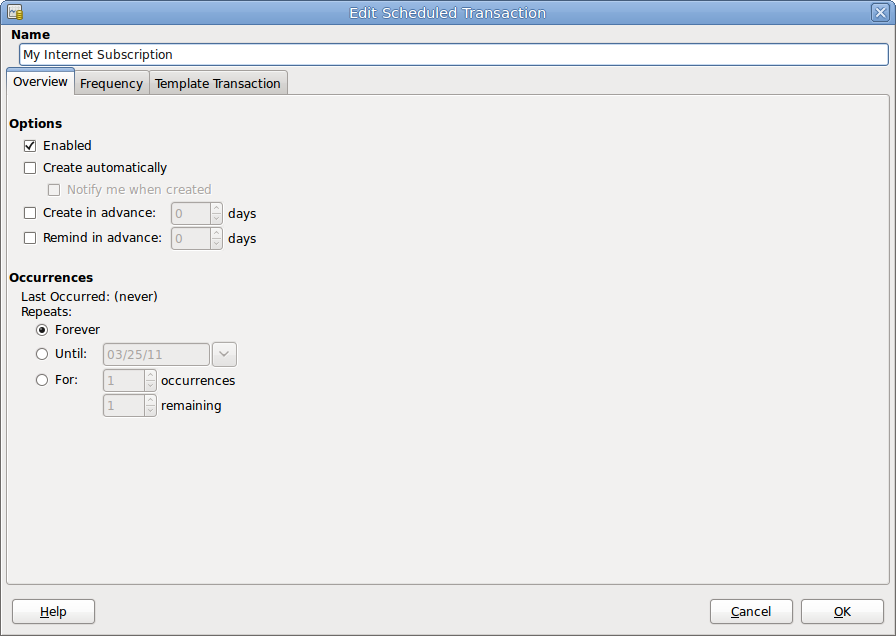
First, let’s enter a name for this new scheduled transaction in the top of the window.
| Note |
|---|---|
This name will only identify the transaction in the Edit Scheduled Transaction window, it will never appear in the ledger. | |
In the Options pane of the Overview tab you have four options:
- Enable
Sets the status of the scheduled transaction.
- Create automatically
If enabled, will insert this transaction in the ledger without asking you before (see below). If needed, you can be advised when the transaction is entered by checking the Notify me when created option.
- Create in advance
Sets how many days in advance the transaction will be created.
- Remind in advance
Sets how many days in advance a reminder is presented. This can be used, for example, when you have to pay something by check, and a reminder one week before allows you to send your check before the deadline.
The Occurences pane allows you to tell GnuCash that this scheduled transaction
won’t last for ever. For example if you are repaying a loan, you can enter the loan
end date or the number of occurences left.
Select now the Frequency tab in the Edit Scheduled Transaction window. Here you can set the time-related options of the transaction.
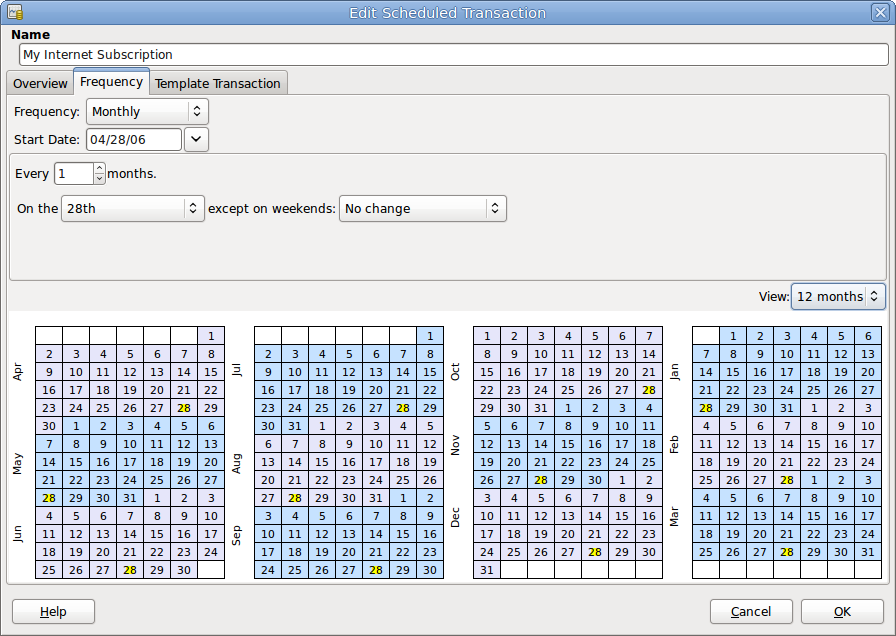
- Frequency
Sets the basic frequency of the transaction, with options for once, daily, weekly, semi-monthly and monthly. In this example, this is set to monthly.
Note It is possible to set a transaction to occur at intervals other than those listed in the Frequency list, by changing the setting in the Every control (see below).
- Start Date
Sets when the transaction will begin. In the example, this would be set to the start of the next month.
- Every
This option allows you to schedule transactions by multiplies of the value in Frequency. For example, to create a transaction that runs every 3 weeks, set Frequency to Weeks and Every to 3.
- On the and Except on weekends
Sets the day of the month that the transaction is scheduled, and controls what
GnuCashwill do when the day occurs on a weekend day.
| Note |
|---|---|
We know that the subscription is taken on the 28th each month, so the Start date will be November 1, 2003 (assuming November is the next month), the Frequency will be Monthly, it will be taken every month on the 28th. Since in our example the internet subscription is automatically taken from the account, we have no need to create it in advance, nor give an end date. | |
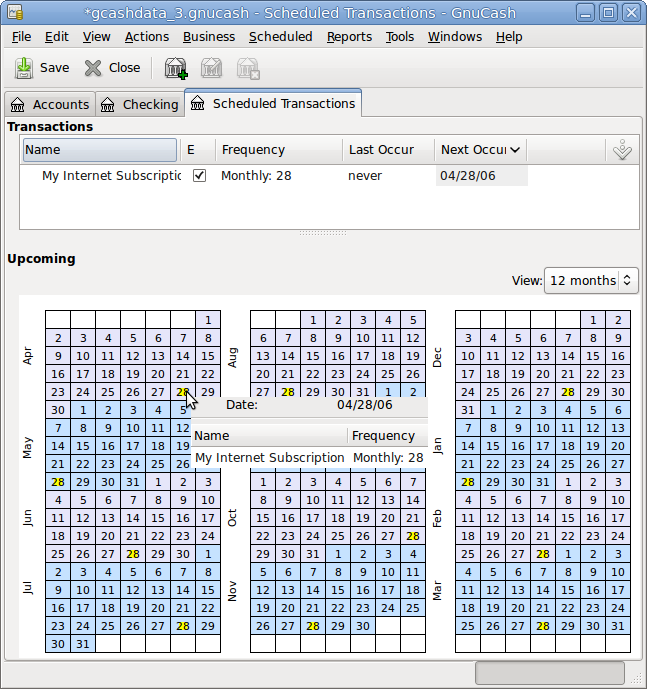
When the elements on this tab are filled in, GnuCash will highlights the calendar below to indicate
when future transactions will be run.
Finally select the Template Transaction tab and enter your transaction in the lower part as you would do in the ledger, with the only difference of having no date.
Now, you should have a window like this:
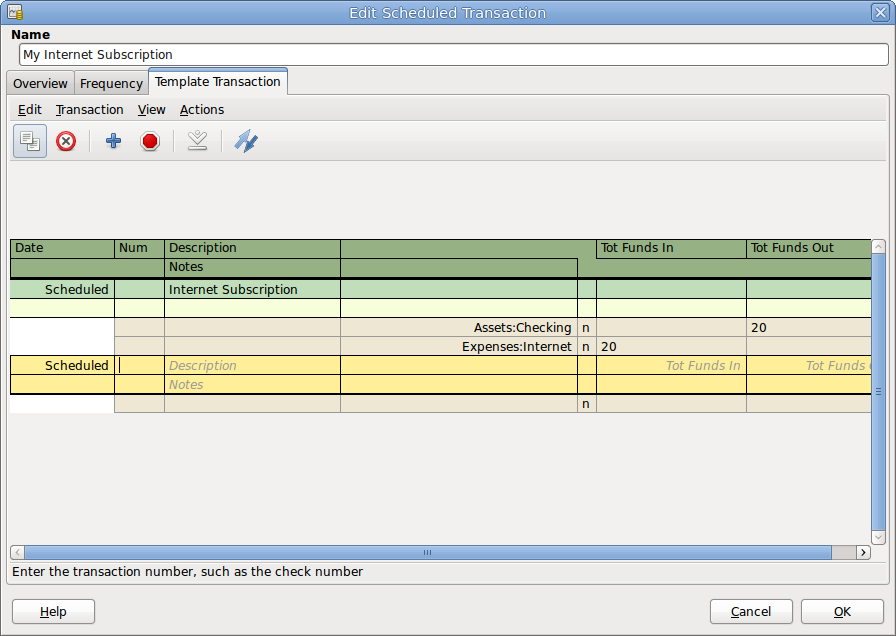
Remember to click on the icon, to validate and enter the transaction.
Now click , it takes you to the Scheduled Transactions tab, now showing one item in the Transactions list:
| Tip |
|---|---|
If you click in the calendar part on the first day of one month, a small window, following your mouse, will show you what is planned for this day. To make the small window disappear again, just click in it one more time. | |
You can now close the Scheduled Transaction tab, and save your work.
| Note |
|---|---|
What comes below is just an illustration, and is not meant to be entered into the | |
From now on, when GnuCash is launched and a scheduled transaction is scheduled or need to be entered,
you may see a Since Last Run... window summarizing the scheduled
transactions operations (Reminder, To-Create
etc... a better description of each option can be found in the GnuCash manual):
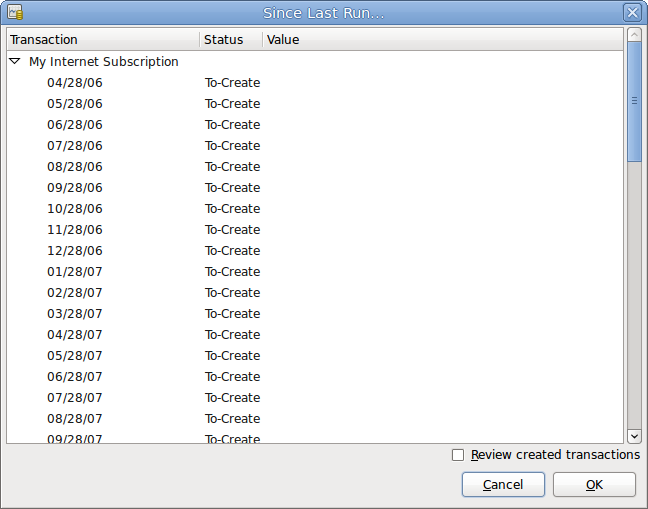
You can click on the Status column to change the scheduled transaction status if needed. Then just click on to close the Since Last Run... window and to apply the pending operations. Select to skip entering in the ledger the pending operations.
If the Status field was set to To-Create, then if you take a look in your bank account register, you’ll see the transaction has been created:
| Tip |
|---|---|
If you enable the Review created transactions option in the lower right of the
Since Last Run... window, | |
| Note |
|---|---|
If you entered the transaction for 28 of April at this stage, then please revert
back to the last saved | |
In the previous sections of this chapter the concepts and mechanics of working with transactions in
GnuCash have been discussed. This section will expand upon the chart of accounts initially built
in the previous chapter, by setting some opening balances, adding transactions and a scheduled
transaction.
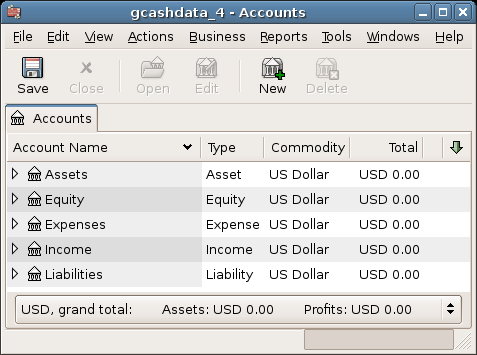
Start with opening the previous datafile we stored, gcashdata_3emptyAccts, and
store it as gcashdata_4 directly. The main window should look something
like this:
As shown earlier in Section 2.9.3.1, “Simple Transaction Example” with the Assets:Checking account, the starting balances in an account are typically assigned to a special account called Equity:Opening Balance. To start filling in this chart of accounts, begin by setting the opening balances for the accounts. Assume that there is $1,000 in the savings account and $500 charged on the credit card.
Open the Assets:Savings account register. Select from the menu and check to make sure you are in Basic Ledger style. You will view your transactions in the other modes later, but for now let’s enter a basic transaction using the basic default style.
From the Assets:Savings account register window, enter a basic 2 account transaction to set your opening balance to $1,000, transferred from Equity:Opening Balance. Remember, basic transactions transfer money from a source account to a destination account. Record the transaction (press the Enter key, or click on the icon).
From the Assets:Checking account register window, enter a basic 2 account transaction to set your opening balance to $1,000, transferred from Equity:Opening Balance.
From the Liabilities:Visa account register window, enter a basic 2 account transaction to set your opening balance to $500, transferred from Equity:Opening Balance. This is done by entering the $500 as a charge in the Visa account (or decrease in the Opening Balance account), since it is money you borrowed. Record the transaction (press the Enter key, or click on the icon).
You should now have 3 accounts with opening balances set. Assets:Checking, Assets:Savings, and Liabilities:Visa.
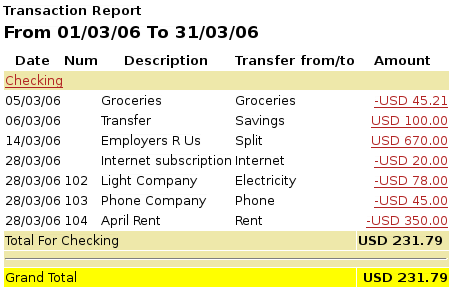
Now add some more transactions to simulate a month’s expenses. During the month, $78 is spent on electricity, $45 on phone, and $350 on rent. All paid by check. We also spent $45.21 on groceries, received $670 as salary, and paid our Internet bill this month. Finally, let’s move $100 from the savings account to the checking account.
Open the Expenses:Electricity account register and enter a simple 2 account transaction to pay the $78 electrical bill at the end of the current month (e.g.: March 28, 2006). Enter a description (e.g.: Light Company) and the check number (e.g.: 102). The Transfer account should be Assets:Checking.
Open the Assets:Checking account register and enter a simple 2 account transaction to pay the $45 phone bill at the end of the current month (e.g.: March 28, 2006). Enter a description (e.g.: Phone Company Name) and the check number (e.g.: 103). The Transfer account should be Expenses:Phone. Notice that you can enter expense transactions from either the credit side (the expense accounts) or the debit side (the asset account).
Open the Expenses:Rent account register and enter a simple 2 account transaction to pay the $350 in rent at the end of the current month (e.g.: March 28, 2006). Enter a description (e.g.: April Rent) and the check number (e.g.: 104). The Transfer account should be Assets:Checking.
Duplicate this transaction using the button in the Toolbar. Start by clicking on the current rent transaction, and click on the Duplicate icon. Enter the transaction date a month out in the future (e.g.: April 28, 2006), and notice the blue line separator that
GnuCashuses to separate future transactions from current ones. In this way, you can enter transactions before they occur.You could also set up a scheduled transaction to pay your rent, since the value of the rent is likely to be constant for the foreseeable future.
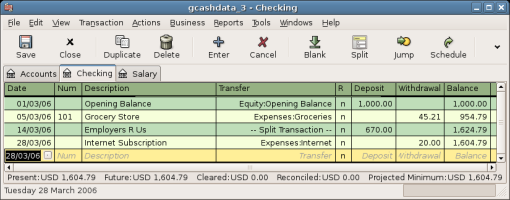
Start by clicking on the current (April 28) rent transaction, and click on the Schedule icon
Change to Monthly, change description if needed and press
To transfer money from your savings account to your checking account, open the Assets:Savings account register, add a new transaction setting the Transfer to Assets:Checking in the amount of $100 (date 6 March, 2006).
As another example of a simple 2 account transaction, add another transaction to describe the purchase of $45.21 worth of groceries on 5 of March. From within the Assets:Checking account, you would set Transfer to Expenses:Groceries. The account register should now appear:
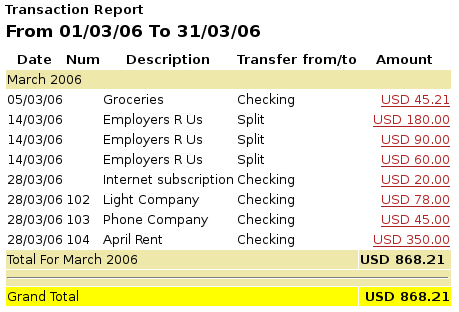
To add a paycheck transaction from the Assets:Checking account register window, click on a new transaction line, and click on Split. First enter the description of this transaction on the first line (e.g.: “Employers R Us”), as well as the date (14 March). In the “split” line below this, enter the deposit into Assets:Checking (e.g.:$670). Follow this with the various tax deposits (Expenses:Taxes:Federal account (e.g.: $180), Expenses:Taxes:Medicare account (e.g.: $90), and Expenses:Taxes:Social Security account (e.g.: $60)) and lastly the gross total of your paycheck (e.g.: $1,000) as a withdrawal transfer from Income:Salary.
You also need to pay for your Internet subscription of 20 USD on the 28th.
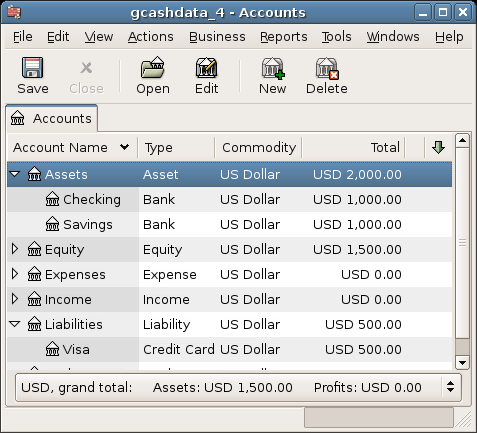
Figure 2.43. Chart Of Accounts After Setting All The Various Transactions
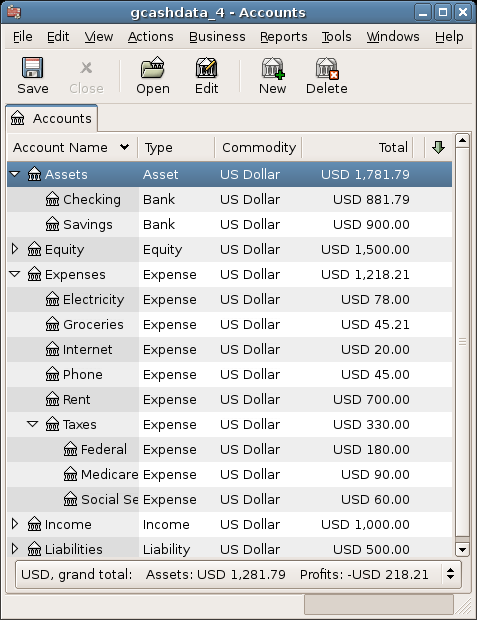
This image shows the ending balances after Section 2.9, “Transactions”.
Before we go to the report section, let’s save the GnuCash data file
(gcashdata_4).
But only having data available on the computer screen will not make your accountant happy, therefore
GnuCash comes with a large number of highly customizable reports.
Let’s have a look at a Cash Flow, and a Transaction Report.
First let’s have a look at the Cash Flow report for the month of March.
Select the cash flow report from → → .
Figure 2.44. Cash Flow Report For The Month Of March
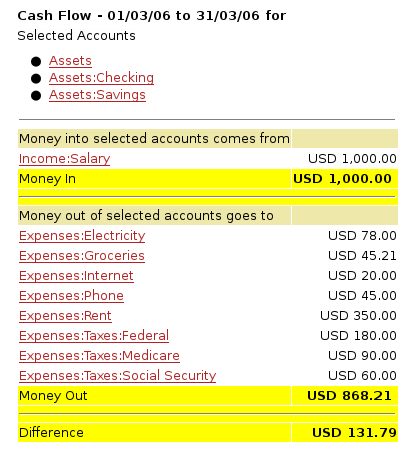
This image shows the Cash Flow report after Section 2.9, “Transactions”.
To get this customized report, right click in the report and choose Report Options. Then set the time period, and specify which accounts you want in the report.
Now let’s have a look at corresponding transaction report for the Checking account.
Select the transaction report from → .
Now let’s change the transaction report to only show the various Expenses accounts.