The account register is the GnuCash window, which allows you to view or edit preexisting transactions, or add new transactions for a particular account. To open an account register from the Account Tree, double-click the account name, right click the account name and select Open Account from the menu, or use the Open button on the toolbar. GnuCash will display the account register window.
The Titlebar of the account register displays the account name. Below the Titlebar, the Menubar displays the menu items available within the account register, and the Toolbar contains handy buttons that help you work with the account register.
At the bottom left of the register window, GnuCash displays helpful messages as you move about the register. To the right, you can see the current account balance and the total of cleared splits.
GnuCash offers several options for viewing your registers. The
default style is Basic Ledger mode, which displays
only the summary of splits affecting the current account. This is the
style that most closely resembles other popular personal financial
packages. You can choose a different register style from the menu. There are two other view modes:
→ style expands the current transaction automatically. As you highlight a new transaction in the register, the transaction automatically expands to show all splits.
→ style shows all splits for all transactions in the register, which is more like an accounting journal.
All styles permit you to view your data in either single-line or double-line format. Select → , and you will see your transaction line expand to two register lines. Double-line mode will also display the transaction-level Notes field.
Below are screenshots that demonstrate how the Basic Ledger and Transaction Journal views differ.
For this example, let’s assume that you have purchased 3 pair of Jeans for $1,000, and have recorded the purchase as a split transaction with each pair entered on a separate split.
The below screenshots illustrate the different view modes.
First let’s view the Jeans transaction from your checking account:

Now, let's open the Expenses:Clothes account, and look at it in Basic view.
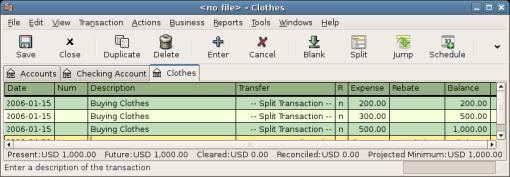
Three entries appear here, but there was only the single split entry in the checking account. Further examination shows that each row has a different amount, $200, $300, and $500. This demonstrates that each row in this view reflects a single split from the original transaction.
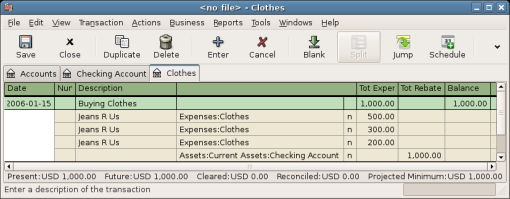
Changing to Transaction Journal mode will display only the original split transaction.
GnuCash provides several time-saving shortcuts for entering your
data. When you type the first few characters of a description that you
have used before, the QuickFill feature automatically fills in the rest of
the transaction as you last entered it. When you type in the first
characters of an account name in either the Transfer
field of the transaction line or the Account field of
the split line, QuickFill will automatically complete the name from your
account list. It also helps you with entering sub-accounts in these
fields: simply type the first characters of the parent account name
followed by a : (colon) and the first characters of the sub-account name. For
example, to enter Assets:Checking, you might type
A:C and let GnuCash fill in the rest.
 | Warning |
|---|---|
Because : is the account separator symbol, you can not use it in your account names. | |
 | Tip |
|---|---|
If you really need the colon in your account names, you can select another symbol by → → +Character. | |
Register keyboard shortcuts also save you time, and GnuCash provides
several of them. In the date field, you can type:
+ or = to increment the date and - or _ to decrement the date
] or } to increment the month and [ or { to decrement the month
M or m to enter the first date of the month
H or h to enter the last date of the month
Y or y to enter the first date of the year
R or r to enter the last date of the year
T or t to enter today’s date
| Tip |
|---|---|
These date shortcuts not only work in the account register but everywhere you can enter a date. | |
| Tip |
|---|---|
Specifically for dates there's another way you can save time: you can enter
partial dates. For example if you only enter one number, | |
In the Num field of the transaction line, you
can type + to increment the transaction number from the
last one you typed in. Typing - will decrement the
number. This will also work in the Action field of
the split line, if you choose to enter split numbers there. The
Action field also supports QuickFill - if you type
the first characters of a common action (such as
Deposit), GnuCash will fill in the rest.
The Transfer field supports QuickFill
of account names. You can start typing an account name and
GnuCash will fill in the remaining part of the name. Typing the
separator character at any time will complete the current level of
the account name, leaving the cursor positioned to start the next
level of account name. For example, typing A:C the
standard set of account names will complete to the
Assets:Checking account. You can also type the
Menu or Ctrl+Down keys in this
field to pop up a list of all account names.
In any of the amount fields, you can use a built-in calculator.
Simply type in the first value, followed by +,
-, *, or /, then type
in the second value. GnuCash will perform the calculation and return the
resulting value to the amount field when you press the
Tab key.
All of the menu items have access keys defined, and these are marked by underlined characters in the menu names. Press Alt + [underlined character] to bring up the menu, then select an item by typing its underlined character. For example, typing Alt+A brings up the Actions menu, then typing P will split the transaction. A few of the menu items also have shortcut keys that immediately invoke the command (typically using the Ctrl key). These shortcuts are listed next to the item.
To move around the register, use these keys to save time:
Tab to move to the next field, Shift+Tab to move to the previous field
Home to move to the beginning of the field, End to move to the end of the field
Enter or ↓ to move to the next transaction, ↑ to move to the previous transaction
Page Up to move up one screen, Page Down to move down one screen
Shift+Page Up to go to the first transaction, Shift+Page Down to go to the last transaction
In the Reconcile window you can use these keyboard shortcuts:
Tab moves to the next box and Shift+Tab moves to the previous box
Space bar toggles the status between reconciled and not reconciled
↑ and ↓ navigate through the entries within the current box