The very first time you open GnuCash, you will see the
Welcome to GnuCash! screen. From there, GnuCash
provides other tools to help you easily find what you are looking for.
Let’s take a look at some of the common screens and screen boxes you will
see.
GnuCash provides a Tip of the Day screen to
give helpful hints for using the program:
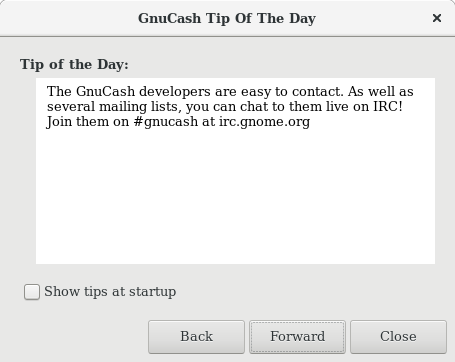
These tips provide useful information for beginning users. To view more of the tips, click to continue. If you do not wish to see this screen box on start-up, deselect the box next to Show tips at startup. When you have finished viewing the helpful tips, click to close the Tip of the Day screen.
You should now see the Accounts window, which appears as shown below. The exact layout of the account tree will depend on which default accounts you selected during the New Account Hierarchy Setup. In this example, the Common Accounts are shown.
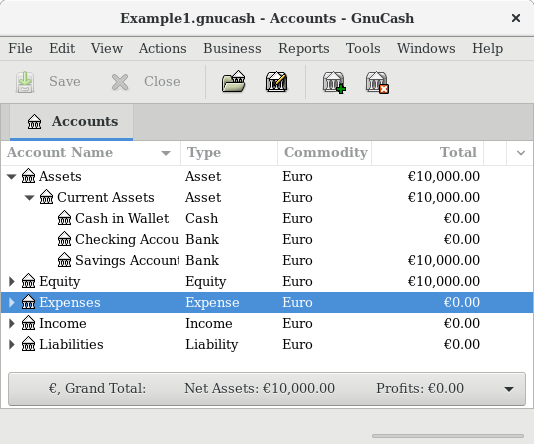
The Account Tree window (also known as a Chart of Accounts, or CoA) provides an overview of the data contained in the current file. It contains a list of account names and their current balances.
From this window, you can open the register of any
account either by double-clicking the account name, right clicking the account name and selecting Open Account from the
menu, or by using the button on the toolbar. GnuCash allows you to have as many account registers open as you wish. For more information on using account registers, see Section 2.3.3, “Account Register Window”.
 | Tip |
|---|---|
Clicking the small triangle to the left of an account that has children will expand the tree view showing child accounts. | |
At the top of this window is the Titlebar, which displays the file name for this set of accounts (once you have saved the file.) Below that is the Menubar. You can access the menu options by either clicking on these menu headings or by using shortcuts and access keys (see Section 2.3.7, “Menu Shortcuts”). Next is the Toolbar, which contains buttons for the most common functions.
The account tree appears below the Toolbar. Once you have started creating accounts, the account names will appear in the account tree. You can customize which headings show up by using the small down-arrow at the far right just above the account tree.
At the bottom is the Statusbar, which tells you information about what you own (Net Assets) and how much money you have made (Profits).
Account Register windows are used to enter and edit your account data. As the name suggests, they look similar to a checkbook register.
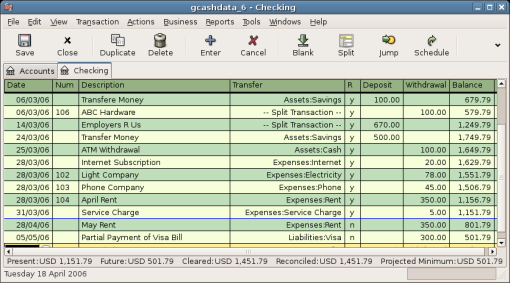
Chapter 4, Transactions explains more about account register windows and how to enter data into them. For now, note that the parts of an account register window are similar to the parts of the account tree window described earlier. The Titlebar at the top contains the account name. Below that, the Menubar contains menu options related to the account register. Toolbar buttons simplify common data entry functions. The Statusbar at the bottom of the window, displays some account balances covered in Chapter 4, Transactions. At the bottom of the account register window, information appears about the current location of the cursor.
 | Note |
|---|---|
In the register windows, you can resize the various columns that
The Description column is designed to expand automatically to fill all unused horizontal screen space. Therefore you should set the widths of all your other columns before setting the Description column width. The Balance column must be resized by double-clicking on the column heading. | |
Both the account tree window and the account register window contain Toolbar buttons. These buttons provide quick access to common functions such as and in the account tree window and and in the account register window. If you are not sure what a button does, move the mouse pointer over that button, and you should see a description of the function appear.
Here is a summary of the account tree window buttons:
Account tree window buttons
Save the current file to disk
Close the current notebook page
- , , and
These are functions related to accounts. They are discussed in Chapter 3, Accounts.
Register-specific buttons are discussed in Chapter 4, Transactions.
GnuCash uses a tabbed model that allows you to open multiple account registers and reports simultaneously. Each open window (which can include account registers, reports, or Scheduled Transactions windows) is given a tab on this bar that you can click to view that window. Tabs can be configured in Preferences to appear along any side of the GnuCash window.
To see the full name for a tab, hover the mouse pointer over an account window tab.
If more screens are open than can be displayed across the screen, some tabs will not display. You can move through all tabs by clicking the arrows on either end of the tab bar. A complete list of tabs can be viewed by right-clicking the Tab Bar and any tab can be selected by clicking it.
The account tree window and the account register window both contain menu headings in a Menubar. Clicking on a menu heading brings up the menu items for that heading.
You can click on the account tree menu headings and then move the mouse pointer over the menu items to see what they do. As the pointer moves over a menu item, a description of the item appears in the lower left-hand corner of the window (inside the Statusbar). To select a menu item, click on it.
You can also access the most common menu items in a window by right-clicking the mouse anywhere in that window. In the account tree window, this will bring up a list of account items. In the account register window, this will bring up a list of transaction items.
Other ways of accessing menu items are through keyboard shortcuts and access keys, described next.
All of the menu items have access keys which are marked by underlined characters in the menu names. Pressing the Alt key with the underlined character in the menu heading will bring up the menu items for that heading. Once the menu items are displayed, type the underlined character in the menu item to activate it. For example, typing Alt+F in the main window brings up the menu, then typing S will save the file. Access keys are fixed and cannot be changed by users.
Some of the more commonly used menu items also have shortcut keys that directly activate the command without having to traverse the menu structure. These shortcuts typically use the Ctrl key, although they can use any key combination. Menu shortcuts are displayed at the end of each menu item.